Hoox MCP:
Hoox inside Claude
Connect Claude Desktop to Hoox in a few minutes. Generate dozens of UGC videos in natural language — without writing a single line of code.
What is
Hoox MCP?
You have learned to use Hoox manually. You understand avatars, scripts, and exports. Now imagine that you could give Claude instructions in natural language, and Claude handled everything inside Hoox for you — creating avatars, generating scripts, launching videos, exporting them — in a loop, across dozens of items at once.
That is exactly what MCP Hoox (Model Context Protocol) enables. A direct bridge between Claude Desktop and the Hoox platform.
🤔 What exactly is MCP?
The Model Context Protocol is an open standard created by Anthropic. It allows Claude to connect to external tools — APIs, databases, software — and control them directly from a conversation.nversation.
In practice: instead of calling the Hoox API with code, you talk to Claude. Claude understands what you want, selects the right tools, calls them in the right order, and keeps you informed at every step.
Natural language
No code. You describe what you want in plain language, Claude does the rest. "Create 10 avatars and generate one video per avatar."
Loop execution
Claude can chain dozens of operations automatically — create avatars, then videos, then exports — without manual intervention.
Contextual intelligence
Claude understands your brief, adapts scripts to your persona, picks the right settings — it is not just clicking, it is reasoning.
Tool orchestration
Claude can combine Hoox tools with other MCPs — Google Drive, Notion, Slack — for even more powerful workflows.
Before
installing
Two conditions are required to use Hoox MCP. Check both before moving on to installation.
Claude Desktop
The Claude desktop app (Mac or PC ). MCP does not work not in the web browser.
⚠️ RequiredHoox Enterprise account
API access, and therefore MCP, is reserved for Enterprise plans. Check that your plan is enabled in Settings → API.
⚠️ Required🔑 Generate your Hoox API key
Whatever your platform (Mac or PC), you will need a Hoox API key. Generate it now:
Go to the Hoox dashboard
Sign in at app.hoox.video/dashboard with your Enterprise account.
Open your workspace settings
Click your workspace settings, then in the side menu select API.
Generate and copy your key
Click "Generate API Key", give it a name, then copy the key immediately. It will only be shown once — keep it somewhere safe.
Installation
on Mac
Mac installation takes 3 steps. Expect about 5 to 10 minutes the first time — especially if you have never used Terminal.
Step 1 — Install Homebrew and uv
Open Terminal (search for "Terminal" in Spotlight with ⌘ + Space) and run this command to install Homebrew:
Once Homebrew is installed, it displays 3 command lines to copy, notte, and run (starting with echo >> ). Run them, then launch:
Step 2 — Hoox API key
You should already have generated your key in the previous section. Keep it handy for the next step.
Step 3 — Configure Claude Desktop
Open Claude settings
In Claude Desktop: Settings → Developer → Local MCP servers
Click "Edit config". This opens Finder on a file named claude_desktop_config.json.
Open the file with a text editor
Right-click the file → Open with → TextEdit (or any other text editor).
Paste the MCP configuration
Replace the file contents with the JSON below, replacing hx_live_your_key_here with your real Hoox API key:
Installation
on PC (Windows)
On Windows, installation is even simpler — a single command is enough to prepare the environment.
Step 1 — Install uv via PowerShell
Open PowerShell (search for "PowerShell" in the Start menu) and run this command:
Set-ExecutionPolicy RemoteSigned -Scope CurrentUser in PowerShell and confirm, then rerun the install command.
Step 2 — Hoox API key
Same process as on Mac: generate your key from app.hoox.video → Settings → API.
Step 3 — Configure Claude Desktop
Open Claude settings
In Claude Desktop: Settings → Developer → Local MCP servers
Click "Edit config". File Explorer opens on the file claude_desktop_config.json.
Open the file with Notepad
Right-click the file → Open with → Notepad (or Notepad++ / VS Code if you have them).
Paste the MCP configuration
Replace the contents with the same JSON as on Mac. Do not forget to replace hx_live_your_key_here with your real key:
hx_live_.
Tools
available
Once MCP is connected, Claude has access to 13 Hoox tools that it can call on request or autonomously. You do not need to know them by heart — Claude knows which one to use based on what you ask.
| Tool | What it does | Typical use |
|---|---|---|
| list_avatars | Lists all avatars available on your account | "Show me my avatars" |
| list_voices | Lists all available voices | "Which female voices are available in French?" |
| create_avatar | Creates a new avatar from an image or a product URL | "Create 10 avatars with this product" |
| get_avatar | Retrieves information about a specific avatar | Check details before starting a generation |
| get_avatar_look | Retrieves look variants for an avatar | Selects a specific look for the video |
| get_avatar_status | Checks whether an avatar is ready to use | Wait time between creation and use |
| edit_avatar | Edits the look of an existing avatar | "Change this avatar’s outfit" |
| generate_script | Generates a UGC script from a prompt or a product URL | "Write 25 scripts for this product" |
| start_generation | Starts video generation | Produces the video with avatar + voice + script |
| get_generation_status | Monitors the progress of a generation in progress | Claude automatically waits for completion |
| start_export | Starts the MP4 export of a generated video | Retrieves the download link |
| get_export_status | Checks whether export is finished | Monitors processing before delivery |
| duplicate_video | Duplicates an existing video to edit it | Creates variations of the same content |
💡 Effective prompt examples
Drop your product page URL directly into the prompt — Claude will scrape the information, generate the scripts, and create the videos:
"Generate 5 UGC videos for this product: [URL]. American tone, 30 seconds, vertical format. Export with Veo 3 Fast."
Claude can generate the same concept in multiple languages with different avatars:
"Take this script and generate a French, English, and Spanish version. Use a different avatar for each language. Export all 3."
To optimize ad performance, ask for variations of the opening hook:
"Generate 10 variations of the same script, changing only the first 5 seconds (the hook ). Same avatar, same voice. I want to test what grabs attention best."
You can notte a list of prompts or URLs directly into the chat:
"Here are 20 different scripts. Generate one video for each, alternating between my 4 avatars. Vertical format, Veo 3 Fast. Tell me when it is done."
Real example:
25 videos from one instruction
Here is a real example: a full production of 25 UGC videos for the brand Jeliskin, launched with a single prompt. Claude handled everything autonomously.
📋 The prompt used
Here is the exact prompt that launched the entire production:
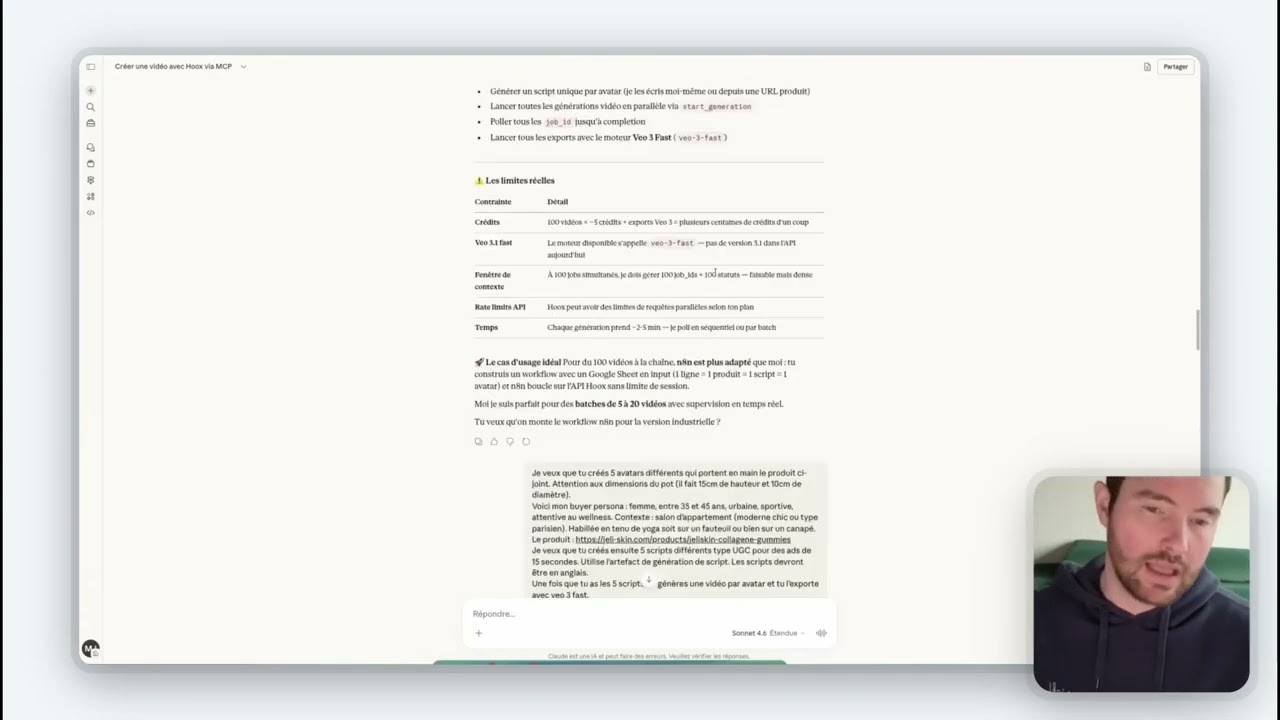
I want you to create 25 different avatars holding the attached product in their hand.
Pay attention to the jar dimensions (it is 15 cm tall and 10 cm in diameter ).
Here is my buyer persona: woman, between 35 and 45 years old, urban, sporty, and attentive to wellness. Context: apartment living room (modern chic or Parisian style ). Wearing yoga clothes, either sitting on an armchair or on a sofa.
The product: https://jeli-skin.com/products/jeliskin-collagene-gummies
Then I want you to create 25 different scripts UGC-style for ads of 15 seconds. Use the script generation artifact. The scripts must be in English.
Once you have the 25 scripts, generate one video per avatar and export it with Veo 3 Fast.
In short: 1 English script = 1 avatar = 1 Veo 3 export.
Tell me if you understood everything correctly.
🤖 What Claude does automatically
Analyze the brief and scrape the product page
Claude visits the Jeliskin URL, extracts the product information (name, benefits, images), and builds the generation context.
Create the 25 avatars in a loop
Claude appelle create_avatar 25 times, varying the looks according to the buyer persona (yoga outfit, Parisian living room, product in hand ). It waits for confirmation of each avatar before moving to the next.
Generate the 25 scripts
Claude creates 25 distinct UGC scripts in English (different hooks, different persuasion angles, 15 seconds each) based on the product information.
Launch the 25 videos and export them
For each avatar/script pair, Claude calls start_generation, monitors the status with get_generation_status, then launches start_export in Veo 3 Fast. It repeats until the 25th.
🧩 Keys to a successful prompt
Precise buyer persona
Age, lifestyle, visual context, outfit — the more precise you are, the more consistent the avatars will be with your target.
Product physical constraints
The jar dimensions allow Claude to calibrate the proportions between the avatar and the product held in hand.
Direct product URL
Claude scrapes the product page to enrich the scripts automatically — benefits, ingredients, brand claims.
Ask for confirmation
"Tell me if you understood everything correctly" is a good practice — Claude restates the plan before executing, which helps avoid mistakes.
Quiz &
Exercise
Validate your knowledge of Hoox MCP before starting your first automated production.
🧠 Quiz — Hoox MCP
0 / 501Which Hoox plan is required to use MCP?
02In which file should you notte the MCP JSON configuration?
03What is the first command to run on Mac to install MCP?
04What is the main difference between MCP and the classic Hoox API?
05In the Jeliskin case, why does Claude ask for confirmation before starting?
Your first MCP production
Follow these steps to complete your first automated production with Hoox MCP. Check off each step as you go.
- Install MCP according to your OS (Mac or PC) — verify that the Hoox icon appears in Claude Desktop
- Test the connection by asking Claude: "List my available avatars on Hoox" — it should reply with your real avatars
- Choose a product that you want to promote (existing product page or fictional product) and define your buyer persona in 3–4 lines
- Write your prompt specifying: number of videos, duration, script language, format (vertical), export model (e.g. Veo 3 Fast)
- Demander confirmation to Claude before it starts — let it restate the plan and correct it if needed
- Launch production and watch Claude chain the tools automatically
- Retrieve the export links and download your videos — then analyze what worked well in your prompt
Ready to produce
differently?
Let’s take 30 minutes to define the offer best suited to your goals.